
How to use spcial fonts on your Blogger
Etiketter:
FONT
Find the font you like to use at:http://www.google.com/fonts/
I choose Tangerine
. . . . . . . . . . . . . . .
Edit HTML of your template
Ad this code just after <head>
<link href="//fonts.googleapis.com/css?family=Tangerine:400,700" rel="stylesheet" type="text/css"/>
find:
<Group description="Tabs Text" selector=".tabs-inner .widget li a">
<Variable name="tabs.font" description="Font" type="font"
default="normal normal 14px Arial, Tahoma, Helvetica, FreeSans, sans-serif" value="normal bold 26px Tangerine"/>
How to change width and height of Blogger top menu bar
Edit HTML of your template, [Ctrl F] search for "/* tabs"/* Tabs
----------------------------------------------- */
.tabs-inner .widget li a {
display: inline-block;
padding: .6em .5em;
font: $(tabs.font);
color: $(tabs.text.color);
border-$startSide: $(tabs.border.width) solid $(content.background.color);
border-$endSide: $(tabs.bevel.border.width) solid $(tabs.border.color);
}
-In the code "padding" the first value [.6] is used for height and second value [1.2] is used for width-
-Decrease 1.2 to .5 and space wil shrink!-
Center Your Blog Header Image
Option A: If you used “INSTEAD OF TITLE AND DESCRIPTION“ option:#header-inner img {margin: 0 auto !important;} #header-inner {text-align:center !important;}
Option B: If you used “BEHIND TITLE AND DESCRIPTION“ option:
#header-inner {background-position: center !important; width: 100% !important;}
Loop Picasa slideshow
Picasa web album
2013-09-28
All right, just noticed that google did something that makes this solution NOT working properly so. Huh, I give up, don't use google any more, use something else as http://www.photosnack.com
Good luck!
<-- OLD SOLUTION -->
Go to your web-picasa album and start the slideshow. Now copy the web address and put it on your blog post or page in a <iframe>
Youre done :)
<div style="position:relative;
top:-20px;
overflow-y:hidden;overflow-x:hidden;height:440px;width:580px">
<div style="position:relative;
top:-50px;
left:-40px;
overflow-y:hidden;overflow-x:hidden;height:100%;width:100%">
<iframe name="g26" style="border:0px double " width=650 height=510 src="https://picasaweb.google.com/108048850740176980730/Sample?noredirect=1#slideshow/"></iframe>
</div>
</div>

Hereis was example with scroll bar and that iritating black frame removed (adjust size):
2013-09-28
All right, just noticed that google did something that makes this solution NOT working properly so. Huh, I give up, don't use google any more, use something else as http://www.photosnack.com
Good luck!
<-- OLD SOLUTION -->
Go to your web-picasa album and start the slideshow. Now copy the web address and put it on your blog post or page in a <iframe>
Youre done :)
<div style="position:relative;
top:-20px;
overflow-y:hidden;overflow-x:hidden;height:440px;width:580px">
<div style="position:relative;
top:-50px;
left:-40px;
overflow-y:hidden;overflow-x:hidden;height:100%;width:100%">
<iframe name="g26" style="border:0px double " width=650 height=510 src="https://picasaweb.google.com/108048850740176980730/Sample?noredirect=1#slideshow/"></iframe>
</div>
</div>

Here
FormEmailer
Etiketter:
FormEmailer
How to send the google spreadsheets value change to email?https://sites.google.com/site/formemailer/getstarted
Note: If you're upgrading from a previous version, take a look at the "Upgrading steps" below.
- Open your Spreadsheet/Form. (It should already have at least the basic structure of your data, i.e. the 1st row filled with the data headers. In case of a Form it's done automatically when you create the form).
- Click menu Insert > Script.
- A internal popup window should open, click the search box and type: formemailer
- A list with some scripts should appear, locate the "FormEmailer" script, developed by hgabreu and click its install button. (nowadays this search returns two scripts and FormEmailer is the 2nd one)
- A authorization popup shows up and you need to click Authorize to proceed.
- A browser popup window shows up, it should close itself automatically. And back to the main window, you can close the Script Gallery internal popup window by clicking Ok.
New install instructions:
You need to set up the trigger so the script can run automatically. Steps:
- Click the menu "Tools" > "Script editor..."
- In the editor's window
-- Make sure the Form sheet script is opened and selected (it normally is)
-- Click the menu "Triggers" > "Current script's triggers..."
--- Click the only link and set up a new trigger as follows:
timeDriven - Time-driven - Minutes timer - Every minute
--- Click save
-- You may close the editor
The status indication in this sheet (cell B2) may take some minutes to update.
How To Add A Gadget/Widget Inside Your Blogger Blog Header
Etiketter:
HEADER
Maybe you have seen that many blogs have AdSense Units or other ads and widgets in the header section of the blog, the most popular format being the AdSense 468x60 ad unit - see in the screenshot below:
But how we can add something inside blogger header - be it a Adsense unit, a search bar, social media buttons or a widget? By simply adding a section in the header. First off, to give space for the extra gadget to fit in, our blogger header should be resized.
A. Resize blogger header
Step 1: Go to Blogger Dashboard >> Design >> Edit HTML and backup your template
Step 2: Check the "Expand widget templates" box
Step 3: Find (CTRL + F) this piece of code:
/* Header
----------------------------------------------- */
Step 4: Replace it with this code:
/* Header
----------------------------------------------- */
.header-left{
display: inline-block;
height: 35px;
width: 350px;
float: left;
}
.header-right {
display:inline-block;
float:right;
}
Change the pixels in red with the image's height and width of your blogger header and change float: left; tofloat: right; if you want to change the position of your logo.
Step 5: Find the below code:
<b:section class='header' id='header' maxwidgets='1' showaddelement='no'>
Step 6: Replace it with:
<b:section class='header header-left' id='header' maxwidgets='1' showaddelement='no'>
Now "Preview" your template, you will find that the background color of Blogger's header is not visible or it's missing. To bring it back, you need to add some more snippets:
Step 7. Find the following code:
</div>
</div>
<div class='header-cap-bottom cap-bottom'>
<div class='cap-left'/>
Step 8. Just above it, paste this:
<div style='clear:both;'/>
Note: if you can't find the code from step 7, search for this instead:
<b:include name='description'/>... and paste the code from step 8 just below it.
</div>
</b:if>
</b:includable>
</b:widget>
</b:section>
Step 9. Save Template.
B. Add extra gadget/widget section to Blogger Header
Let's go one step forward and add an extra gadget section within Blogger header in new template designers.
Step 1: Go to Dashboard >> Design >> Edit HTML and backup your template.
Step 2: Find for the below code which you have implemented in previous step:
<div style='clear:both;'/>
Step 3. Paste before/above it, the following code:
<b:section class='header-right crosscol' id='header-right' maxwidgets='1' showaddelement='yes'/>
Step 4. Now find:
]]></b:skin>
Step 5. Paste just above it, this CSS code:
.header-right {
display:inline-block;
float:right;
width:400px;
}
Change the width that is marked in red color. Increase or decrease the pixels according to your needs and positioning new header section.
Step 6. Save Template.
Now all you have to do is to go to Design >> Page Elements tab and add a new gadget to the newly created extra header section in Blogger. You may find that the extra gadget section is created just under your Blogger header as shown in the image below.

Don't worry about its position, the widget now should appear side by side.
If you have any questions or need some help, leave a comment below
onMouseOver
Div 1 Content
Div 2 Content
Div 3 Content
Code:
<style type="text/css">
#div1, #div2, #div3 {
visibility: hidden;
}
</style>
<script>
function show(id) {
document.getElementById(id).style.visibility = "visible";
}
function hide(id) {
document.getElementById(id).style.visibility = "hidden";
}
</script>
<br />
<div onmouseout="hide('div1')" onmouseover="show('div1')">
<div id="div1">
Div 1 Content</div>
</div>
<div onmouseout="hide('div2')" onmouseover="show('div2')">
<div id="div2">
Div 2 Content</div>
</div>
<div onmouseout="hide('div3')" onmouseover="show('div3')">
<div id="div3">
Div 3 Content</div>
</div>
How do I use a custom domain name for my blog?
Etiketter:
CUSTOM DOMAIN
How do I use a custom domain name for my blog?
Blogger offers two free publishing options for your blog: hosting on Blogspot (example.blogspot.com) and hosting on your own custom domain (www.example.com or foo.example.com). You can change your publishing option at anytime, and your content will always remain unaltered regardless of which of these options you choose.
Where would you like to host your blog?
- Find the control panel on your domain registrar’s website, and locate your DNS (Domain Name System) settings. In order to link your blog to your custom domain, follow the instructions below to enter your "CNAME" and "A-records."
CNAME
Add two CNAME records. For the first CNAME, where it says Name, Label or Host enter "www" and where it says Destination, Target orPoints To enter "ghs.google.com" . For the second CNAME, enter "GW26MQQP5H23" as the Name and
"gv-JVWOGD4ONAHGEF.dv.googlehosted.com." as the Destination. See our detailed instructions on providing CNAMEs for various registrars. If yours isn't listed, or if you run into other difficulties, contact your registrar directly and they can help you out.
A-records (optional)
The following action links your naked domain (example.com) to your actual site (www.example.com). If you skip this step, visitors who leave off the "www" will see an error page.
Enter your domain name in the format example.com, and list the I.P. addresses shown below in the "A" section. You'll need to create four separate A-records which point to four different Google IPs.
216.239.32.21
216.239.34.21
216.239.36.21
216.239.38.21 - Update your Blogger settings
Before you move onto this step, wait about an hour for your DNS settings to activate. If you attempt to change the publishing settings before the DNS changes activate, then we'll let you know with a warning message.
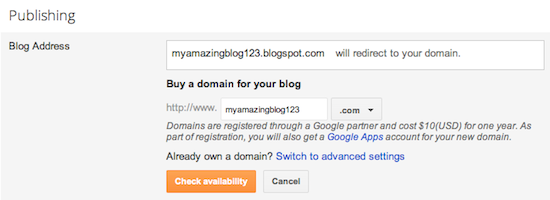
Now it’s time to make sure Blogger knows about your custom domain so that Google can direct readers to your blog. Just head back to Blogger and update the information on your Settings | Basic tab. Find the area for "Publishing," and click the link to add a custom domain.


- If your new domain isn't taking you to your blog, wait another day or two to make sure all the DNS servers have been updated. If it still isn't working, contact your registrar to make sure you entered the DNS settings correctly.
- Your original Blogspot address will automatically forward to your new domain. That way, any existing links or bookmarks to your site will still work.
- Your posted images will continue to display on your blog.
Prenumerera på:
Inlägg
(
Atom
)