
Contact Form on a page
Etiketter:
ContactForm
,
Formulär
<div class="form"><!-- Custom Contact Form By WG Starts -->
<form name="contact-form">
<!-- Name Field -->
<input class="contact-form-name" id="ContactForm1_contact-form-name" name="name" onblur="if (this.value == "") {this.value = "Namn";}" onfocus="if (this.value == "Namn") {this.value = "";}" size="30" type="text" value="Namn" />
<br /><!-- Email ID Field -->
<input class="contact-form-email" id="ContactForm1_contact-form-email" name="email" onblur="if (this.value == "") {this.value = "Email";}" onfocus="if (this.value == "Email") {this.value = "";}" size="30" type="text" value="Email" />
<br /><!-- Message Field -->
<textarea class="contact-form-email-message" id="ContactForm1_contact-form-email-message" name="email-message" onblur="if (this.value == "") {this.value = "Leave Your Message..";}" onfocus="if (this.value == "Leave Your Message..") {this.value = "";}" value="Leave Your Message.."></textarea>
<br /><!-- Clear Button -->
<input class="WG-btnLogin" type="reset" value="Ta Bort" />
<!-- Send Button -->
<input class="WG-btnLogin" id="ContactForm1_contact-form-submit" type="button" value="Skicka" />
<!-- Validation -->
<div style="max-width: 222px; text-align: center; width: 100%;">
<div class="contact-form-error-message" id="ContactForm1_contact-form-error-message">
</div>
<div class="contact-form-success-message" id="ContactForm1_contact-form-success-message">
</div>
</div>
</form>
<!-- Custom Contact Form By WG Ends --> </div>
Link Exchange Slideshow
Etiketter:
LinkExchange
,
SLIDESHOW
-

AMEA STÄD
DESCRIPTION HERE -

CH Tryckeri
DESCRIPTION HERE -

G26
DESCRIPTION HERE -

HÅRSTATION
DESCRIPTION HERE -

IDEAL KEMTVÄTT
DESCRIPTION HERE -

SUSHI BY KYOTO
DESCRIPTION HERE -

SVE I ALLT
DESCRIPTION HERE
Change widget title text color
Mall > Redigera HTML<Variable name="widget.title.text.color" description="Title Color" type="color" default="#888888" value="#888887"/>
How to Make a Google Spreadsheet Send an Email on Change
Etiketter:
Google Drive
,
Spreadsheet
,
WebDesign
Reblog from http://www.cloudtouch.co.uk/2012/03/08/how-to-make-a-google-spreadsheet-send-an-email-on-change/
Here’s a quick and useful tip for Google Spreadsheets.
If you’ve created a form you’re going to want to receive a notification when someone submits it. Fortunately Google Spreadsheets come with a pretty powerful Notification tool. You can configure it to send you a notification email for pretty much any eventuality. Including when someone submits a form.
What you need is the “Notification rules…” editor, which you can access from the Tools menu. Open it up, click “Add Rule…” and you’ll be presented with this dialog box:

The eagle-eyed will immediately spot the “A user submits a form” option. You’re going to want to check that box. then depending on how immediately you want to be notified, go for either the “daily digest” or the “right away” option.
And there you have it, that’s how to have your spreadsheet notify you when it changes i.e when someone submits a form, edits it or changes the collaborators.
Websidor
Etiketter:
Hemsidor
http://www.clipboard.sehttp://linneasvan.se/
http://www.vinterviken.eu/
http://www.teichmann.se/
http://www.oleole.se/
http://www.ciaociaogrande.com/
http://www.apg.se/wp/
http://www.espressini.se/
http://www.chtryckeri.se/
http://www.g26.se/
http://www.sushibykyoto.se/
http://www.jakthornet.eu/
http://www.saschasmaleri.se/
http://www.flystapizzeria.se/
http://www.opizzicato.se
http://www.soderkisen.nu
http://www.hairstation.se
http://www.sveiallt.se/
http://www.amea.nu/
http://alexandrascafe.blogspot.se
http://hagernaskrog.blogspot.se
mm.
Reklam
Etiketter:
Reklam
Exempel på reklam och reklamskyltar mm. kan ses påhttp://reklamskyltar.blogspot.se
How to use a custom domain name for blogger blog?
Etiketter:
CUSTOM DOMAIN
Find the control panel on your domain registrar’s website, and locate your DNS (Domain Name System) settings. In order to link your blog to your custom domain, follow the instructions below to enter your "CNAME" and "A-records."
CNAME
Add two CNAME records. For the first CNAME, where it says Name, Label or Host enter "www" and where it says Destination, Target orPoints To enter "ghs.google.com" .
Add two CNAME records. For the first CNAME, where it says Name, Label or Host enter "www" and where it says Destination, Target orPoints To enter "ghs.google.com" .
A-records (optional)
The following action links your naked domain (example.com) to your actual site (www.example.com). If you skip this step, visitors who leave off the "www" will see an error page.
Enter your domain name in the format example.com, and list the I.P. addresses shown below in the "A" section. You'll need to create four separate A-records which point to four different Google IPs.
216.239.32.21
216.239.34.21
216.239.36.21
216.239.38.21
- Update your Blogger settings
Before you move onto this step, wait about an hour for your DNS settings to activate. If you attempt to change the publishing settings before the DNS changes activate, then we'll let you know with a warning message.
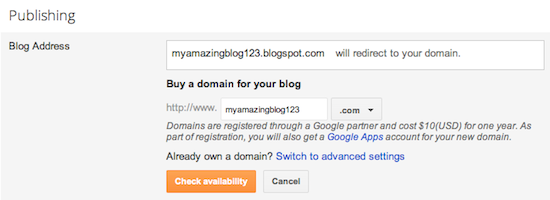
Now it’s time to make sure Blogger knows about your custom domain so that Google can direct readers to your blog. Just head back to Blogger and update the information on your Settings | Basic tab. Find the area for "Publishing," and click the link to add a custom domain.

Congratulations, you’re all set!
Some helpful notes:
- If your new domain isn't taking you to your blog, wait another day or two to make sure all the DNS servers have been updated. If it still isn't working, contact your registrar to make sure you entered the DNS settings correctly.
- Your original Blogspot address will automatically forward to your new domain. That way, any existing links or bookmarks to your site will still work.
- Your posted images will continue to display on your blog.
Prenumerera på:
Inlägg
(
Atom
)