
Fyll i kontaktformuläret och beskriv era önskemål så återkommer vi med förslag som bäst passar era behov.
ELLER
★ LÅT OSS HJÄLPA ER MED HEMSIDAN
Behöver du en snygg hemsida som är enkel att hantera?
Vill du kunna byta priser och lägga till eller ta bort varor och tjänster i din prislista?
Vill du att dina kunder enkelt bokar bord (restaurang) eller bokar tid (tex. frisör) i din kalender?
Vill du att ditt företag kommer med på Googles sökningar så att dina kunder hittar dig?
Vill du kunna skicka ett nyhetsbrev, erbjudanden eller Veckans Meny till dina befintliga kunder?
Vill du kunna sälja dina tjänster och produkter på en Webbshop?
Vill du dessutom ha allt detta problemfritt och helt gratis?
Ja då har du kommit rätt, det enda du behöver är ett Google konto!
Följ bara de enkla anvisningarna här nedan. Lycka till!
★ 1. Skaffa ett Gmail konto om du inte redan har ett
Vill du kunna byta priser och lägga till eller ta bort varor och tjänster i din prislista?
Vill du att dina kunder enkelt bokar bord (restaurang) eller bokar tid (tex. frisör) i din kalender?
Vill du att ditt företag kommer med på Googles sökningar så att dina kunder hittar dig?
Vill du kunna skicka ett nyhetsbrev, erbjudanden eller Veckans Meny till dina befintliga kunder?
Vill du kunna sälja dina tjänster och produkter på en Webbshop?
Vill du dessutom ha allt detta problemfritt och helt gratis?
Ja då har du kommit rätt, det enda du behöver är ett Google konto!
Följ bara de enkla anvisningarna här nedan. Lycka till!
★ 1. Skaffa ett Gmail konto om du inte redan har ett
Om du inte vet hur man gör kan du se den här filmen om hur man skapar ett Gmail konto
★ 2. Gå till www.blogger.com , Logga in med ditt Gmailkonto och följ anvisningarna där.
► Klicka här för att börja bygga din hemsida. (Logga in med ditt gmail-konto!)
Se den här filmen om hur man skapar en HEMSIDA på blogger.com
I filmen visas bara snabbt steg för steg hur man börjar från början, sedan är det bara att experimentera. På internet och Youtube kan man hitta de flesta svar på sina frågor så det är bara att söka. Lycka till!
Hemsidan på Blogger (Blogspot) är snygg, enkel att hantera och uppdatera och är problemfri. Dessutom kan man välja mellan en hel del olika teman (utseende och design), lägga in olika nyttiga moduler så kallade Gadgets mm.
Varsegod !
★ 3. Skaffa en gratis Webbshop på https://tictail.com/
★ Eget Domännamn !
Företagets namn punkt se (www.exempel.se) eller .com .nu .eu .net .org och så vidare. Domännamnet kan kopplas till ovanstående.
Man kan registrera en domän hos olika "registrars" De jag testat nu i över 10 års tid med goda erfarenheter är Loopia, de erbjuder även andra bra webblösningar.
► Klicka här för att registrera ett domännamn hos Loopia
► Tycker du att det är krångligt? Låt oss hjälpa dig med registrering mm. Kicka HÄR
★★★
I bloggen försöker jag ge svar på en del frågor om hur och vad man kan göra på sin blog / hemsida
I bloggen försöker jag ge svar på en del frågor om hur och vad man kan göra på sin blog / hemsida

★ SKAPA DIN EGEN HEMSIDA SJÄLV HELT GRATIS !

http://www.blogger.com
Logga in med ditt gmail konto (email-adress och lösenord)
Välj: Redigera inlägg
För att redigera första sidan klicka på "Redigera"
För att redigera en annan sida (till exempel "Meny") välj Fliken [Redigera sidor], välj vilken sida du vill redigera och klicka på "Redigera"
Lycka till !
Redigera din hemsida
Find the font you like to use at:
http://www.google.com/fonts/
I choose Tangerine
. . . . . . . . . . . . . . .
Edit HTML of your template
Ad this code just after <head>
<link href="//fonts.googleapis.com/css?family=Tangerine:400,700" rel="stylesheet" type="text/css"/>
find:
<Group description="Tabs Text" selector=".tabs-inner .widget li a">
<Variable name="tabs.font" description="Font" type="font"
default="normal normal 14px Arial, Tahoma, Helvetica, FreeSans, sans-serif" value="normal bold 26px Tangerine"/>
http://www.google.com/fonts/
I choose Tangerine
. . . . . . . . . . . . . . .
Edit HTML of your template
Ad this code just after <head>
<link href="//fonts.googleapis.com/css?family=Tangerine:400,700" rel="stylesheet" type="text/css"/>
find:
<Group description="Tabs Text" selector=".tabs-inner .widget li a">
<Variable name="tabs.font" description="Font" type="font"
default="normal normal 14px Arial, Tahoma, Helvetica, FreeSans, sans-serif" value="normal bold 26px Tangerine"/>
How to use spcial fonts on your Blogger
Edit HTML of your template, [Ctrl F] search for "/* tabs"
/* Tabs
----------------------------------------------- */
.tabs-inner .widget li a {
display: inline-block;
padding: .6em .5em;
font: $(tabs.font);
color: $(tabs.text.color);
border-$startSide: $(tabs.border.width) solid $(content.background.color);
border-$endSide: $(tabs.bevel.border.width) solid $(tabs.border.color);
}
-In the code "padding" the first value [.6] is used for height and second value [1.2] is used for width-
-Decrease 1.2 to .5 and space wil shrink!-
/* Tabs
----------------------------------------------- */
.tabs-inner .widget li a {
display: inline-block;
padding: .6em .5em;
font: $(tabs.font);
color: $(tabs.text.color);
border-$startSide: $(tabs.border.width) solid $(content.background.color);
border-$endSide: $(tabs.bevel.border.width) solid $(tabs.border.color);
}
-In the code "padding" the first value [.6] is used for height and second value [1.2] is used for width-
-Decrease 1.2 to .5 and space wil shrink!-
How to change width and height of Blogger top menu bar
Option A: If you used “INSTEAD OF TITLE AND DESCRIPTION“ option:
#header-inner img {margin: 0 auto !important;} #header-inner {text-align:center !important;}
Option B: If you used “BEHIND TITLE AND DESCRIPTION“ option:
#header-inner {background-position: center !important; width: 100% !important;}
#header-inner img {margin: 0 auto !important;} #header-inner {text-align:center !important;}
Option B: If you used “BEHIND TITLE AND DESCRIPTION“ option:
#header-inner {background-position: center !important; width: 100% !important;}
Center Your Blog Header Image
Picasa web album
2013-09-28
All right, just noticed that google did something that makes this solution NOT working properly so. Huh, I give up, don't use google any more, use something else as http://www.photosnack.com
Good luck!
<-- OLD SOLUTION -->
Go to your web-picasa album and start the slideshow. Now copy the web address and put it on your blog post or page in a <iframe>
Youre done :)
<div style="position:relative;
top:-20px;
overflow-y:hidden;overflow-x:hidden;height:440px;width:580px">
<div style="position:relative;
top:-50px;
left:-40px;
overflow-y:hidden;overflow-x:hidden;height:100%;width:100%">
<iframe name="g26" style="border:0px double " width=650 height=510 src="https://picasaweb.google.com/108048850740176980730/Sample?noredirect=1#slideshow/"></iframe>
</div>
</div>

Hereis was example with scroll bar and that iritating black frame removed (adjust size):
2013-09-28
All right, just noticed that google did something that makes this solution NOT working properly so. Huh, I give up, don't use google any more, use something else as http://www.photosnack.com
Good luck!
<-- OLD SOLUTION -->
Go to your web-picasa album and start the slideshow. Now copy the web address and put it on your blog post or page in a <iframe>
Youre done :)
<div style="position:relative;
top:-20px;
overflow-y:hidden;overflow-x:hidden;height:440px;width:580px">
<div style="position:relative;
top:-50px;
left:-40px;
overflow-y:hidden;overflow-x:hidden;height:100%;width:100%">
<iframe name="g26" style="border:0px double " width=650 height=510 src="https://picasaweb.google.com/108048850740176980730/Sample?noredirect=1#slideshow/"></iframe>
</div>
</div>

Here
Loop Picasa slideshow
How to send the google spreadsheets value change to email?
https://sites.google.com/site/formemailer/getstarted
New install instructions:
You need to set up the trigger so the script can run automatically. Steps:
- Click the menu "Tools" > "Script editor..."
- In the editor's window
-- Make sure the Form sheet script is opened and selected (it normally is)
-- Click the menu "Triggers" > "Current script's triggers..."
--- Click the only link and set up a new trigger as follows:
timeDriven - Time-driven - Minutes timer - Every minute
--- Click save
-- You may close the editor
The status indication in this sheet (cell B2) may take some minutes to update.
https://sites.google.com/site/formemailer/getstarted
Note: If you're upgrading from a previous version, take a look at the "Upgrading steps" below.
- Open your Spreadsheet/Form. (It should already have at least the basic structure of your data, i.e. the 1st row filled with the data headers. In case of a Form it's done automatically when you create the form).
- Click menu Insert > Script.
- A internal popup window should open, click the search box and type: formemailer
- A list with some scripts should appear, locate the "FormEmailer" script, developed by hgabreu and click its install button. (nowadays this search returns two scripts and FormEmailer is the 2nd one)
- A authorization popup shows up and you need to click Authorize to proceed.
- A browser popup window shows up, it should close itself automatically. And back to the main window, you can close the Script Gallery internal popup window by clicking Ok.
New install instructions:
You need to set up the trigger so the script can run automatically. Steps:
- Click the menu "Tools" > "Script editor..."
- In the editor's window
-- Make sure the Form sheet script is opened and selected (it normally is)
-- Click the menu "Triggers" > "Current script's triggers..."
--- Click the only link and set up a new trigger as follows:
timeDriven - Time-driven - Minutes timer - Every minute
--- Click save
-- You may close the editor
The status indication in this sheet (cell B2) may take some minutes to update.
FormEmailer
Maybe you have seen that many blogs have AdSense Units or other ads and widgets in the header section of the blog, the most popular format being the AdSense 468x60 ad unit - see in the screenshot below:

But how we can add something inside blogger header - be it a Adsense unit, a search bar, social media buttons or a widget? By simply adding a section in the header. First off, to give space for the extra gadget to fit in, our blogger header should be resized.
A. Resize blogger header
Step 1: Go to Blogger Dashboard >> Design >> Edit HTML and backup your template
Step 2: Check the "Expand widget templates" box
Step 3: Find (CTRL + F) this piece of code:
Step 4: Replace it with this code:
Change the pixels in red with the image's height and width of your blogger header and change float: left; tofloat: right; if you want to change the position of your logo.
Step 5: Find the below code:
Step 6: Replace it with:
Now "Preview" your template, you will find that the background color of Blogger's header is not visible or it's missing. To bring it back, you need to add some more snippets:
Step 7. Find the following code:
Step 8. Just above it, paste this:
Note: if you can't find the code from step 7, search for this instead:
Step 9. Save Template.
B. Add extra gadget/widget section to Blogger Header
Let's go one step forward and add an extra gadget section within Blogger header in new template designers.
Step 1: Go to Dashboard >> Design >> Edit HTML and backup your template.
Step 2: Find for the below code which you have implemented in previous step:
Step 3. Paste before/above it, the following code:
Step 4. Now find:
Step 5. Paste just above it, this CSS code:
Change the width that is marked in red color. Increase or decrease the pixels according to your needs and positioning new header section.
Step 6. Save Template.
Now all you have to do is to go to Design >> Page Elements tab and add a new gadget to the newly created extra header section in Blogger. You may find that the extra gadget section is created just under your Blogger header as shown in the image below.

Don't worry about its position, the widget now should appear side by side.

But how we can add something inside blogger header - be it a Adsense unit, a search bar, social media buttons or a widget? By simply adding a section in the header. First off, to give space for the extra gadget to fit in, our blogger header should be resized.
A. Resize blogger header
Step 1: Go to Blogger Dashboard >> Design >> Edit HTML and backup your template
Step 2: Check the "Expand widget templates" box
Step 3: Find (CTRL + F) this piece of code:
/* Header
----------------------------------------------- */
Step 4: Replace it with this code:
/* Header
----------------------------------------------- */
.header-left{
display: inline-block;
height: 35px;
width: 350px;
float: left;
}
.header-right {
display:inline-block;
float:right;
}
Change the pixels in red with the image's height and width of your blogger header and change float: left; tofloat: right; if you want to change the position of your logo.
Step 5: Find the below code:
<b:section class='header' id='header' maxwidgets='1' showaddelement='no'>
Step 6: Replace it with:
<b:section class='header header-left' id='header' maxwidgets='1' showaddelement='no'>
Now "Preview" your template, you will find that the background color of Blogger's header is not visible or it's missing. To bring it back, you need to add some more snippets:
Step 7. Find the following code:
</div>
</div>
<div class='header-cap-bottom cap-bottom'>
<div class='cap-left'/>
Step 8. Just above it, paste this:
<div style='clear:both;'/>
Note: if you can't find the code from step 7, search for this instead:
<b:include name='description'/>... and paste the code from step 8 just below it.
</div>
</b:if>
</b:includable>
</b:widget>
</b:section>
Step 9. Save Template.
B. Add extra gadget/widget section to Blogger Header
Let's go one step forward and add an extra gadget section within Blogger header in new template designers.
Step 1: Go to Dashboard >> Design >> Edit HTML and backup your template.
Step 2: Find for the below code which you have implemented in previous step:
<div style='clear:both;'/>
Step 3. Paste before/above it, the following code:
<b:section class='header-right crosscol' id='header-right' maxwidgets='1' showaddelement='yes'/>
Step 4. Now find:
]]></b:skin>
Step 5. Paste just above it, this CSS code:
.header-right {
display:inline-block;
float:right;
width:400px;
}
Change the width that is marked in red color. Increase or decrease the pixels according to your needs and positioning new header section.
Step 6. Save Template.
Now all you have to do is to go to Design >> Page Elements tab and add a new gadget to the newly created extra header section in Blogger. You may find that the extra gadget section is created just under your Blogger header as shown in the image below.

Don't worry about its position, the widget now should appear side by side.
If you have any questions or need some help, leave a comment below
How To Add A Gadget/Widget Inside Your Blogger Blog Header
Div 1 Content
Div 2 Content
Div 3 Content
Code:
<style type="text/css">
#div1, #div2, #div3 {
visibility: hidden;
}
</style>
<script>
function show(id) {
document.getElementById(id).style.visibility = "visible";
}
function hide(id) {
document.getElementById(id).style.visibility = "hidden";
}
</script>
<br />
<div onmouseout="hide('div1')" onmouseover="show('div1')">
<div id="div1">
Div 1 Content</div>
</div>
<div onmouseout="hide('div2')" onmouseover="show('div2')">
<div id="div2">
Div 2 Content</div>
</div>
<div onmouseout="hide('div3')" onmouseover="show('div3')">
<div id="div3">
Div 3 Content</div>
</div>
onMouseOver
How do I use a custom domain name for my blog?
Blogger offers two free publishing options for your blog: hosting on Blogspot (example.blogspot.com) and hosting on your own custom domain (www.example.com or foo.example.com). You can change your publishing option at anytime, and your content will always remain unaltered regardless of which of these options you choose.
Where would you like to host your blog?
- Find the control panel on your domain registrar’s website, and locate your DNS (Domain Name System) settings. In order to link your blog to your custom domain, follow the instructions below to enter your "CNAME" and "A-records."
CNAME
Add two CNAME records. For the first CNAME, where it says Name, Label or Host enter "www" and where it says Destination, Target orPoints To enter "ghs.google.com" . For the second CNAME, enter "GW26MQQP5H23" as the Name and
"gv-JVWOGD4ONAHGEF.dv.googlehosted.com." as the Destination. See our detailed instructions on providing CNAMEs for various registrars. If yours isn't listed, or if you run into other difficulties, contact your registrar directly and they can help you out.
A-records (optional)
The following action links your naked domain (example.com) to your actual site (www.example.com). If you skip this step, visitors who leave off the "www" will see an error page.
Enter your domain name in the format example.com, and list the I.P. addresses shown below in the "A" section. You'll need to create four separate A-records which point to four different Google IPs.
216.239.32.21
216.239.34.21
216.239.36.21
216.239.38.21 - Update your Blogger settings
Before you move onto this step, wait about an hour for your DNS settings to activate. If you attempt to change the publishing settings before the DNS changes activate, then we'll let you know with a warning message.
Now it’s time to make sure Blogger knows about your custom domain so that Google can direct readers to your blog. Just head back to Blogger and update the information on your Settings | Basic tab. Find the area for "Publishing," and click the link to add a custom domain.

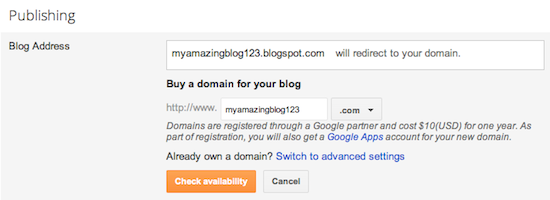
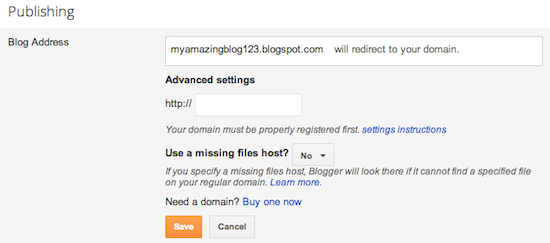
- If your new domain isn't taking you to your blog, wait another day or two to make sure all the DNS servers have been updated. If it still isn't working, contact your registrar to make sure you entered the DNS settings correctly.
- Your original Blogspot address will automatically forward to your new domain. That way, any existing links or bookmarks to your site will still work.
- Your posted images will continue to display on your blog.
How do I use a custom domain name for my blog?
Remove “Home” link under the post in Blogger
In the Add Custom CSS paste following CSS code:
#blog-pager {
display:none;
}
Remove dotted line under the post in Blogger
In the Add Custom CSS paste following CSS code:
.footer-outer {
border: none !important;
}
< Press enter after character above - do not include this text in the code when you do this - this is just a tip>
In the Add Custom CSS paste following CSS code:
#blog-pager {
display:none;
}
Remove dotted line under the post in Blogger
In the Add Custom CSS paste following CSS code:
.footer-outer {
border: none !important;
}
< Press enter after character above - do not include this text in the code when you do this - this is just a tip>
Ta bort "Startsida" länk under inlägg
HOW TO CENTER YOUR PAGE TABS IN BLOGGER
In the template designer, click on “Advanced” and “Add CSS” and add the following code to the box:
.PageList {text-align:center !important;}
.PageList li {display:inline !important; float:none !important;}
CENTER YOUR PAGE TABS IN BLOGGER
Ta bort eller kommentera bort följande mening på rad c:a 1240 med <!-- --> :
<b:include data='feedLinks' name='feedLinksBody'/>
<b:include data='feedLinks' name='feedLinksBody'/>
Ta bort Prenumerera på: Inlägg (Atom)
How to Remove “Home” link under the post in Blogger
In the Add Custom CSS paste following CSS code:
#blog-pager {
display:none;
}
.footer-outer {
border: none !important;
}
< Press enter after character above - do not include this text in the code when you do this - this is just a tip>
Remove "Home" link under the post
Customize Contact Form of Blogger
1. Add Contact Form in Blogger
2. Add Contact Form in Static Page
3. Customize Contact Form in New Look
Part 1. Add Contact Form in Blogger
Login to Blogger > Dashborad
Click on Drop Down Menu and select Layout
Add Gadget
Click on More Gadget
Select Contact Form
Now Give a Name to your Contact Form as we recommend you should give Contact Form
Finally your Contact Form Saved.
Part 2. Add Contact Form in Static Page
Login to Blogger > Dashborad
Click on Drop Down Menu and select Pages
Click on New Page
Select Blank Page
Now Click on HTML an Paste below code in it.
--------------------------------------------------------
<div class='form'>
<!-- Custom Contact Form By WG Starts -->
<form name='contact-form'>
<!-- Name Field -->
<input class='contact-form-name' id='ContactForm1_contact-form-name' name='name' value="Name" size='30' type='text' onblur='if (this.value == "") {this.value = "Name";}' onfocus='if (this.value == "Name") {this.value = "";}' />
<p></p>
<!-- Email ID Field -->
<input class='contact-form-email' id='ContactForm1_contact-form-email' name='email' value="Email ID" size='30' type='text' onblur='if (this.value == "") {this.value = "Email ID";}' onfocus='if (this.value == "Email ID") {this.value = "";}'/>
<p></p>
<!-- Message Field -->
<textarea class='contact-form-email-message' id='ContactForm1_contact-form-email-message' name='email-message' value='Leave Your Message..' onblur='if (this.value == "") {this.value = "Leave Your Message..";}' onfocus='if (this.value == "Leave Your Message..") {this.value = "";}'></textarea>
<p></p>
<!-- Clear Button -->
<input class='WG-btnLogin' type='reset' value='Clear'/>
<!-- Send Button -->
<input class='WG-btnLogin' id='ContactForm1_contact-form-submit' type='button' value='Send'/>
<p></p>
<!-- Validation -->
<div style='text-align: center; max-width: 222px; width: 100%'>
<p class='contact-form-error-message' id='ContactForm1_contact-form-error-message'></p>
<p class='contact-form-success-message' id='ContactForm1_contact-form-success-message'></p>
</div>
</form>
<!-- Custom Contact Form By WG Ends -->
</div>
---------------------------------------------------------
Finally Publish that Page
Part 3. Customize Contact Form in New Look
Login to Blogger > Dashborad
Click on Drop Down Menu and select Template
Backup your Template before making any changes to your blog
Press Ctrl + F and search the code shown below.
----------------------------------------------
]]></b:skin>
----------------------------------------------
Paste Below code just above it.
----------------------------------------------
#ContactForm1
{
display: none ! important;
}
----------------------------------------------
Now Search for </head>
Paste below code just before </head>
----------------------------------------------
<b:if cond='data:blog.pageType == "static_page"'>
<style>
#ContactForm1{ display:none!important;}
</style>
</b:if>
<style>
/*---- Compatible contact Form by WG -----*/
.contact-form-name, .contact-form-email, .contact-form-email-message {
max-width: 220px;
width: 100%;
font-weight:bold;
}
.contact-form-name {
background: #FFF url(https://blogger.googleusercontent.com/img/b/R29vZ2xl/AVvXsEg4iUn5PfouHYzsSPQZfKahztf2bCtAR735MUSJQGuJaSXJXOsX4cuFtS2mOhGHtNu278yT_hpbRVOFmqf2WiRBXJphBYAcGd585dukeHqnVgETN8HvnI4tfeqXV6TuIT1A1-kQbihWB28/s320/name.png) no-repeat 7px 8px;
background-color: #FFF;
border: 1px solid #ddd;
box-sizing: border-box;
color: #A0A0A0;
display: inline-block;
font-family: Arial,sans-serif;
font-size: 12px;
font-weight:bold;
height: 24px;
margin: 0;
margin-top: 5px;
padding: 5px 15px 5px 28px;
vertical-align: top;
}
.contact-form-email {
background: #FFF url(https://blogger.googleusercontent.com/img/b/R29vZ2xl/AVvXsEiL3FGKmhsUUCB5VaUPDcJvT7HLyYr0sh1BEi8ZI-H7H52prZFDPxyJaVBaJVyEXkfQZK8gB5gx0eF1Gr6HZXDUhNtzrcrU_aAd7rSSgtw61hT-8SbqMKeoxl2_Y-UcX2ELqdS-qKVhuHc/s320/email.png) no-repeat 7px 10px;
background-color: #FFF;
border: 1px solid #ddd;
box-sizing: border-box;
color: #A0A0A0;
display: inline-block;
font-family: Arial,sans-serif;
font-size: 12px;
font-weight:bold;
height: 24px;
margin: 0;
margin-top: 5px;
padding: 5px 15px 5px 28px;
vertical-align: top;
}
.contact-form-email:hover, .contact-form-name:hover{
border: 1px solid #bebebe;
box-shadow: 0 1px 2px rgba(5, 95, 255, .1);
padding: 5px 15px 5px 28px;
}
.contact-form-email-message:hover {
border: 1px solid #bebebe;
box-shadow: 0 1px 2px rgba(5, 95, 255, .1);
padding: 10px;
}
.contact-form-email-message {
background: #FFF;
background-color: #FFF;
border: 1px solid #ddd;
box-sizing: border-box;
color: #A0A0A0;
display: inline-block;
font-family: arial;
font-size: 12px;
margin: 0;
margin-top: 5px;
padding: 10px;
vertical-align: top;
max-width: 350px!important;
height: 150px;
border-radius:4px;
}
.contact-form-button {
cursor:pointer;
height: 32px;
line-height: 28px;
font-weight:bold;
border:none;
}
.contact-form-button {
display: inline-block;
zoom: 1; /* zoom and *display = ie7 hack for display:inline-block */
*display: inline;
vertical-align: baseline;
margin: 0 2px;
outline: none;
cursor: pointer;
text-align: center;
text-decoration: none;
font: 14px/100% Arial, Helvetica, sans-serif;
padding: .5em 2em .55em;
text-shadow: 0 1px 1px rgba(0,0,0,.3);
-webkit-border-radius: .5em;
-moz-border-radius: .5em;
border-radius: .5em;
-webkit-box-shadow: 0 1px 2px rgba(0,0,0,.2);
-moz-box-shadow: 0 1px 2px rgba(0,0,0,.2);
box-shadow: 0 1px 2px rgba(0,0,0,.2);
}
.contact-form-button:hover {
text-decoration: none;
}
.contact-form-button:active {
position: relative;
top: 1px;
}
.WG-btnLogin
{
-moz-border-radius:2px;
-webkit-border-radius:2px;
border-radius:15px;
background:#a1d8f0;
background:-moz-linear-gradient(top, #badff3, #7acbed);
background:-webkit-gradient(linear, center top, center bottom, from(#badff3), to(#7acbed));
-ms-filter: "progid:DXImageTransform.Microsoft.gradient(startColorStr='#badff3', EndColorStr='#7acbed')";
border:1px solid #7db0cc !important;
cursor: pointer;
padding:11px 16px;
font:bold 11px/14px Verdana, Tahomma, Geneva;
text-shadow:rgba(0,0,0,0.2) 0 1px 0px;
color:#fff;
-moz-box-shadow:inset rgba(255,255,255,0.6) 0 1px 1px, rgba(0,0,0,0.1) 0 1px 1px;
-webkit-box-shadow:inset rgba(255,255,255,0.6) 0 1px 1px, rgba(0,0,0,0.1) 0 1px 1px;
box-shadow:inset rgba(255,255,255,0.6) 0 1px 1px, rgba(0,0,0,0.1) 0 1px 1px;
margin-center:12px;
float:center;
padding:7px 21px;
}
.WG-btnLogin:hover,
.btnLogin:focus,
.btnLogin:active{
background:#a1d8f0;
background:-moz-linear-gradient(top, #7acbed, #badff3);
background:-webkit-gradient(linear, center top, center bottom, from(#7acbed), to(#badff3));
-ms-filter: "progid:DXImageTransform.Microsoft.gradient(startColorStr='#7acbed', EndColorStr='#badff3')";
}
.WG-btnLogin:active
{
text-shadow:rgba(0,0,0,0.3) 0 -1px 0px;
}
</style>
<!--[if IE 9]>
<style>
.contact-form-name {
background: #FFF url(https://blogger.googleusercontent.com/img/b/R29vZ2xl/AVvXsEg4iUn5PfouHYzsSPQZfKahztf2bCtAR735MUSJQGuJaSXJXOsX4cuFtS2mOhGHtNu278yT_hpbRVOFmqf2WiRBXJphBYAcGd585dukeHqnVgETN8HvnI4tfeqXV6TuIT1A1-kQbihWB28/s320/name.png) no-repeat 7px 0px;
}
.contact-form-email {
background: #FFF url(https://blogger.googleusercontent.com/img/b/R29vZ2xl/AVvXsEiL3FGKmhsUUCB5VaUPDcJvT7HLyYr0sh1BEi8ZI-H7H52prZFDPxyJaVBaJVyEXkfQZK8gB5gx0eF1Gr6HZXDUhNtzrcrU_aAd7rSSgtw61hT-8SbqMKeoxl2_Y-UcX2ELqdS-qKVhuHc/s320/email.png) no-repeat 7px 6px;
}
</style>
<![endif]-->
<style>
@media screen and (-webkit-min-device-pixel-ratio:0) {
.contact-form-name {
background: #FFF url(https://blogger.googleusercontent.com/img/b/R29vZ2xl/AVvXsEg4iUn5PfouHYzsSPQZfKahztf2bCtAR735MUSJQGuJaSXJXOsX4cuFtS2mOhGHtNu278yT_hpbRVOFmqf2WiRBXJphBYAcGd585dukeHqnVgETN8HvnI4tfeqXV6TuIT1A1-kQbihWB28/s320/name.png) no-repeat 7px 6px;
padding: 15px 15px 15px 28px;
}
.contact-form-email {
background: #FFF url(https://blogger.googleusercontent.com/img/b/R29vZ2xl/AVvXsEiL3FGKmhsUUCB5VaUPDcJvT7HLyYr0sh1BEi8ZI-H7H52prZFDPxyJaVBaJVyEXkfQZK8gB5gx0eF1Gr6HZXDUhNtzrcrU_aAd7rSSgtw61hT-8SbqMKeoxl2_Y-UcX2ELqdS-qKVhuHc/s320/email.png) no-repeat 7px 8px;
padding: 15px 15px 15px 28px;
}
.contact-form-email:hover, .contact-form-name:hover{
padding: 15px 15px 15px 28px;
}
.contact-form-button {
height: 28px;
}
}
</style>
----------------------------------------------
Finally Save your Template and Say Bingo be'coz you are done with it.
Enjoy with Professional look of your own personal contact form :)
1. Add Contact Form in Blogger
2. Add Contact Form in Static Page
3. Customize Contact Form in New Look
Part 1. Add Contact Form in Blogger
Login to Blogger > Dashborad
Click on Drop Down Menu and select Layout
Add Gadget
Click on More Gadget
Select Contact Form
Now Give a Name to your Contact Form as we recommend you should give Contact Form
Finally your Contact Form Saved.
Part 2. Add Contact Form in Static Page
Login to Blogger > Dashborad
Click on Drop Down Menu and select Pages
Click on New Page
Select Blank Page
Now Click on HTML an Paste below code in it.
--------------------------------------------------------
<div class='form'>
<!-- Custom Contact Form By WG Starts -->
<form name='contact-form'>
<!-- Name Field -->
<input class='contact-form-name' id='ContactForm1_contact-form-name' name='name' value="Name" size='30' type='text' onblur='if (this.value == "") {this.value = "Name";}' onfocus='if (this.value == "Name") {this.value = "";}' />
<p></p>
<!-- Email ID Field -->
<input class='contact-form-email' id='ContactForm1_contact-form-email' name='email' value="Email ID" size='30' type='text' onblur='if (this.value == "") {this.value = "Email ID";}' onfocus='if (this.value == "Email ID") {this.value = "";}'/>
<p></p>
<!-- Message Field -->
<textarea class='contact-form-email-message' id='ContactForm1_contact-form-email-message' name='email-message' value='Leave Your Message..' onblur='if (this.value == "") {this.value = "Leave Your Message..";}' onfocus='if (this.value == "Leave Your Message..") {this.value = "";}'></textarea>
<p></p>
<!-- Clear Button -->
<input class='WG-btnLogin' type='reset' value='Clear'/>
<!-- Send Button -->
<input class='WG-btnLogin' id='ContactForm1_contact-form-submit' type='button' value='Send'/>
<p></p>
<!-- Validation -->
<div style='text-align: center; max-width: 222px; width: 100%'>
<p class='contact-form-error-message' id='ContactForm1_contact-form-error-message'></p>
<p class='contact-form-success-message' id='ContactForm1_contact-form-success-message'></p>
</div>
</form>
<!-- Custom Contact Form By WG Ends -->
</div>
---------------------------------------------------------
Finally Publish that Page
Part 3. Customize Contact Form in New Look
Login to Blogger > Dashborad
Click on Drop Down Menu and select Template
Backup your Template before making any changes to your blog
Press Ctrl + F and search the code shown below.
----------------------------------------------
]]></b:skin>
----------------------------------------------
Paste Below code just above it.
----------------------------------------------
#ContactForm1
{
display: none ! important;
}
----------------------------------------------
Now Search for </head>
Paste below code just before </head>
----------------------------------------------
<b:if cond='data:blog.pageType == "static_page"'>
<style>
#ContactForm1{ display:none!important;}
</style>
</b:if>
<style>
/*---- Compatible contact Form by WG -----*/
.contact-form-name, .contact-form-email, .contact-form-email-message {
max-width: 220px;
width: 100%;
font-weight:bold;
}
.contact-form-name {
background: #FFF url(https://blogger.googleusercontent.com/img/b/R29vZ2xl/AVvXsEg4iUn5PfouHYzsSPQZfKahztf2bCtAR735MUSJQGuJaSXJXOsX4cuFtS2mOhGHtNu278yT_hpbRVOFmqf2WiRBXJphBYAcGd585dukeHqnVgETN8HvnI4tfeqXV6TuIT1A1-kQbihWB28/s320/name.png) no-repeat 7px 8px;
background-color: #FFF;
border: 1px solid #ddd;
box-sizing: border-box;
color: #A0A0A0;
display: inline-block;
font-family: Arial,sans-serif;
font-size: 12px;
font-weight:bold;
height: 24px;
margin: 0;
margin-top: 5px;
padding: 5px 15px 5px 28px;
vertical-align: top;
}
.contact-form-email {
background: #FFF url(https://blogger.googleusercontent.com/img/b/R29vZ2xl/AVvXsEiL3FGKmhsUUCB5VaUPDcJvT7HLyYr0sh1BEi8ZI-H7H52prZFDPxyJaVBaJVyEXkfQZK8gB5gx0eF1Gr6HZXDUhNtzrcrU_aAd7rSSgtw61hT-8SbqMKeoxl2_Y-UcX2ELqdS-qKVhuHc/s320/email.png) no-repeat 7px 10px;
background-color: #FFF;
border: 1px solid #ddd;
box-sizing: border-box;
color: #A0A0A0;
display: inline-block;
font-family: Arial,sans-serif;
font-size: 12px;
font-weight:bold;
height: 24px;
margin: 0;
margin-top: 5px;
padding: 5px 15px 5px 28px;
vertical-align: top;
}
.contact-form-email:hover, .contact-form-name:hover{
border: 1px solid #bebebe;
box-shadow: 0 1px 2px rgba(5, 95, 255, .1);
padding: 5px 15px 5px 28px;
}
.contact-form-email-message:hover {
border: 1px solid #bebebe;
box-shadow: 0 1px 2px rgba(5, 95, 255, .1);
padding: 10px;
}
.contact-form-email-message {
background: #FFF;
background-color: #FFF;
border: 1px solid #ddd;
box-sizing: border-box;
color: #A0A0A0;
display: inline-block;
font-family: arial;
font-size: 12px;
margin: 0;
margin-top: 5px;
padding: 10px;
vertical-align: top;
max-width: 350px!important;
height: 150px;
border-radius:4px;
}
.contact-form-button {
cursor:pointer;
height: 32px;
line-height: 28px;
font-weight:bold;
border:none;
}
.contact-form-button {
display: inline-block;
zoom: 1; /* zoom and *display = ie7 hack for display:inline-block */
*display: inline;
vertical-align: baseline;
margin: 0 2px;
outline: none;
cursor: pointer;
text-align: center;
text-decoration: none;
font: 14px/100% Arial, Helvetica, sans-serif;
padding: .5em 2em .55em;
text-shadow: 0 1px 1px rgba(0,0,0,.3);
-webkit-border-radius: .5em;
-moz-border-radius: .5em;
border-radius: .5em;
-webkit-box-shadow: 0 1px 2px rgba(0,0,0,.2);
-moz-box-shadow: 0 1px 2px rgba(0,0,0,.2);
box-shadow: 0 1px 2px rgba(0,0,0,.2);
}
.contact-form-button:hover {
text-decoration: none;
}
.contact-form-button:active {
position: relative;
top: 1px;
}
.WG-btnLogin
{
-moz-border-radius:2px;
-webkit-border-radius:2px;
border-radius:15px;
background:#a1d8f0;
background:-moz-linear-gradient(top, #badff3, #7acbed);
background:-webkit-gradient(linear, center top, center bottom, from(#badff3), to(#7acbed));
-ms-filter: "progid:DXImageTransform.Microsoft.gradient(startColorStr='#badff3', EndColorStr='#7acbed')";
border:1px solid #7db0cc !important;
cursor: pointer;
padding:11px 16px;
font:bold 11px/14px Verdana, Tahomma, Geneva;
text-shadow:rgba(0,0,0,0.2) 0 1px 0px;
color:#fff;
-moz-box-shadow:inset rgba(255,255,255,0.6) 0 1px 1px, rgba(0,0,0,0.1) 0 1px 1px;
-webkit-box-shadow:inset rgba(255,255,255,0.6) 0 1px 1px, rgba(0,0,0,0.1) 0 1px 1px;
box-shadow:inset rgba(255,255,255,0.6) 0 1px 1px, rgba(0,0,0,0.1) 0 1px 1px;
margin-center:12px;
float:center;
padding:7px 21px;
}
.WG-btnLogin:hover,
.btnLogin:focus,
.btnLogin:active{
background:#a1d8f0;
background:-moz-linear-gradient(top, #7acbed, #badff3);
background:-webkit-gradient(linear, center top, center bottom, from(#7acbed), to(#badff3));
-ms-filter: "progid:DXImageTransform.Microsoft.gradient(startColorStr='#7acbed', EndColorStr='#badff3')";
}
.WG-btnLogin:active
{
text-shadow:rgba(0,0,0,0.3) 0 -1px 0px;
}
</style>
<!--[if IE 9]>
<style>
.contact-form-name {
background: #FFF url(https://blogger.googleusercontent.com/img/b/R29vZ2xl/AVvXsEg4iUn5PfouHYzsSPQZfKahztf2bCtAR735MUSJQGuJaSXJXOsX4cuFtS2mOhGHtNu278yT_hpbRVOFmqf2WiRBXJphBYAcGd585dukeHqnVgETN8HvnI4tfeqXV6TuIT1A1-kQbihWB28/s320/name.png) no-repeat 7px 0px;
}
.contact-form-email {
background: #FFF url(https://blogger.googleusercontent.com/img/b/R29vZ2xl/AVvXsEiL3FGKmhsUUCB5VaUPDcJvT7HLyYr0sh1BEi8ZI-H7H52prZFDPxyJaVBaJVyEXkfQZK8gB5gx0eF1Gr6HZXDUhNtzrcrU_aAd7rSSgtw61hT-8SbqMKeoxl2_Y-UcX2ELqdS-qKVhuHc/s320/email.png) no-repeat 7px 6px;
}
</style>
<![endif]-->
<style>
@media screen and (-webkit-min-device-pixel-ratio:0) {
.contact-form-name {
background: #FFF url(https://blogger.googleusercontent.com/img/b/R29vZ2xl/AVvXsEg4iUn5PfouHYzsSPQZfKahztf2bCtAR735MUSJQGuJaSXJXOsX4cuFtS2mOhGHtNu278yT_hpbRVOFmqf2WiRBXJphBYAcGd585dukeHqnVgETN8HvnI4tfeqXV6TuIT1A1-kQbihWB28/s320/name.png) no-repeat 7px 6px;
padding: 15px 15px 15px 28px;
}
.contact-form-email {
background: #FFF url(https://blogger.googleusercontent.com/img/b/R29vZ2xl/AVvXsEiL3FGKmhsUUCB5VaUPDcJvT7HLyYr0sh1BEi8ZI-H7H52prZFDPxyJaVBaJVyEXkfQZK8gB5gx0eF1Gr6HZXDUhNtzrcrU_aAd7rSSgtw61hT-8SbqMKeoxl2_Y-UcX2ELqdS-qKVhuHc/s320/email.png) no-repeat 7px 8px;
padding: 15px 15px 15px 28px;
}
.contact-form-email:hover, .contact-form-name:hover{
padding: 15px 15px 15px 28px;
}
.contact-form-button {
height: 28px;
}
}
</style>
----------------------------------------------
Finally Save your Template and Say Bingo be'coz you are done with it.
Enjoy with Professional look of your own personal contact form :)
Customize Contact Form of Blogger
Ad to CSS
.post h3 {display: none !important;}
.post h3 {display: none !important;}
Remove the Title From Blogger Pages
From your Blogger Dashboard, go to Layout > click on Add a Gadget link
From the pop-up window, scroll down and choose HTML/JavaScript
Inside the empty box, add the following code:
<div class="eggTray">
<script src="http://helplogger.googlecode.com/svn/trunk/listbadge.js">{"pipe_id":"1a6640e2a78b2c6e736f2220529daae5","_btype":"list",
"pipe_params":{"URL":"YOUR-BLOG/feeds/posts/default"},
"hideHeader":"false","height":"500","count": 8 }</script>
<div style="font-family: arial, sans-serif; font-size: 9px;" class="ycdr"><a href="http://helplogger.blogspot.com/2012/05/recent-posts-widget-with-thumbnails-for.html" target="_blank" title="Grab this widget">Recent Posts Thumbnails</a> <a href="http://helplogger.blogspot.com/" target="_blank">Blogger Widget</a></div><noscript>Your browser does not support JavaScript!</noscript></div>
<style type=text/css>
.eggTray {margin:10px 0px;padding:0px;}
.ybr li {border-bottom:0px #cccccc dotted; padding:0px 0px 10px 0px!important;}
.pipesTitle {padding-top:0px;}
.pipesDescription {display:true;}
.ycdr {background:transparent url(https://blogger.googleusercontent.com/img/b/R29vZ2xl/AVvXsEiHjCcnJn1a7D_Vg8Y9vx_X_nUoVXhqzD8q2NcXIR-kkm6GP7PsF1OxmGjnq_juG5V6RchxFUqYwJXk_SE7OmURISVlNyGQJN9YJ-z02xys2GWY6hrIBxDOhpgwuIXJiNFj_lYhI3JS7qU/s1600/logo.png) 0px 0px no-repeat; padding: 1px 0px 0px 19px; height:14px; margin: 4px 0px 0px 0px;line-height:14px;}
.ycdr, .ycdr a {color:#999999;}
.widget .popular-posts ul {padding-left:0;}
</style>
! Replace YOUR-BLOG with the url of your site/blog (ex: http://helplogger.blogspot.com) and pay attention to have no forward slash symbol "/" at the end of your url, otherwise it won't function properly.
From the pop-up window, scroll down and choose HTML/JavaScript
Inside the empty box, add the following code:
<div class="eggTray">
<script src="http://helplogger.googlecode.com/svn/trunk/listbadge.js">{"pipe_id":"1a6640e2a78b2c6e736f2220529daae5","_btype":"list",
"pipe_params":{"URL":"YOUR-BLOG/feeds/posts/default"},
"hideHeader":"false","height":"500","count": 8 }</script>
<div style="font-family: arial, sans-serif; font-size: 9px;" class="ycdr"><a href="http://helplogger.blogspot.com/2012/05/recent-posts-widget-with-thumbnails-for.html" target="_blank" title="Grab this widget">Recent Posts Thumbnails</a> <a href="http://helplogger.blogspot.com/" target="_blank">Blogger Widget</a></div><noscript>Your browser does not support JavaScript!</noscript></div>
<style type=text/css>
.eggTray {margin:10px 0px;padding:0px;}
.ybr li {border-bottom:0px #cccccc dotted; padding:0px 0px 10px 0px!important;}
.pipesTitle {padding-top:0px;}
.pipesDescription {display:true;}
.ycdr {background:transparent url(https://blogger.googleusercontent.com/img/b/R29vZ2xl/AVvXsEiHjCcnJn1a7D_Vg8Y9vx_X_nUoVXhqzD8q2NcXIR-kkm6GP7PsF1OxmGjnq_juG5V6RchxFUqYwJXk_SE7OmURISVlNyGQJN9YJ-z02xys2GWY6hrIBxDOhpgwuIXJiNFj_lYhI3JS7qU/s1600/logo.png) 0px 0px no-repeat; padding: 1px 0px 0px 19px; height:14px; margin: 4px 0px 0px 0px;line-height:14px;}
.ycdr, .ycdr a {color:#999999;}
.widget .popular-posts ul {padding-left:0;}
</style>
! Replace YOUR-BLOG with the url of your site/blog (ex: http://helplogger.blogspot.com) and pay attention to have no forward slash symbol "/" at the end of your url, otherwise it won't function properly.
- To disable the scroll bar, remove the number 500
- By default, this widget is set to display a maximum of 8 recent posts. To change this number, replace the number 8 with the number of posts desired
- if you want only the posts titles to appear, change true to none and "0" from padding-top:0px with 10
Add the Recent Blogger Posts
Prenumerera på:
Inlägg
(
Atom
)